Hello!

I love to dye fabric, make thread pictures and quilt. I live in the Yukon on an acreage with my husband, 2 dogs and 34 fish. It's the 'good' life.

Wednesday, September 12, 2012

Whitehorse Horse

 I am working on things after my busy weekend, and will post a little piece I finished tomorrow. I wanted to show you all something that I love and have never actually gotten close enough to take pictures of.
Recently the town of Whitehorse, Yukon erected a new Public Safety building. They commissioned an art piece of a metal horse made by a Yukon artist Daphne Mennel. It is a magnificent sight to see and I am fortunate to see it every morning as I drive to work.
At the top of 2 Mile Hill overlooking the city of Whitehorse, Yukon

Daphne created this piece with donated pieces of metal from a number of Yukon residents. For instance the tail is made from electrical cable donated by Yukon Electric (my favorite parts), and there are other treasures-- a pair of glasses, a frying pan, an anvil, a horse bridal, a radiator front, garden utensils such as a rake and 3 prong thingie, a muffler, bike spokes, and many, many more treasures. 
Look at that gorgeous tail!

I love the face!


I am so happy I finally went and took a good look at this piece. We are fortunate to have it in our community!

Friday, September 7, 2012

Fall Class-Grasses Thread Embroidery

I am teaching an embroidery class this fall, and it needed to be a piece that could be completed in 4 hours which includes instruction/practice time. I chose to do a small grass scene that was embellished with wheat stalks and some cow parsley. I have taken pictures of my progress for you all, and it all went just fine until I decided to add a few details with several felt pens. Wait till you see what happened.  :-(
To begin, I find the picture I like, then I trace it out. I used a composite of these pictures:
  
I did a rough line drawing of a blob (seriously), then I added some shooting grasses and wheat stalks. Several circles within the blob helped me to decide where to add the cow parsely. You want to see the drawing? Seriously? Here it is:
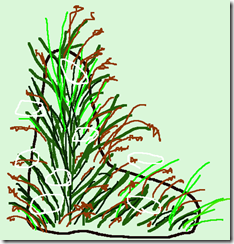
image Nice, isn’t it?! This is really the picture I used to start the process.  Smile
Tip! I use these $1.00 Christmas lights and chuck them under my sewing table as a light source to trace the design. I use a disappearing pen (the purple kind) to make my marks. You may not see my marks, but I’m sure you can see how well these Christmas lights work as a light source..
 
I started freehand sewing with the darkest colour. I used a dark green in the bobbin and top—this may or may not be important to you. It depends on whether you have your bobbin thread showing on the top. I like that look, so I get a variegated look . The darkest colour defines the shape and helps to create depth as the piece evolves.

The second colour I added was a mid green on top and the same dark green thread in the bobbin. The use of a different green continues to add depth and variation in a piece. My rule of thumb is to add 3 colours at a minimum to make the piece look realistic and give that 3D quality to a piece. You can probably still see the purple markings I am using as a reference.
 DSCN2867
After the mid green colour was added, I added an acid green to give the grass some light and used the mid green colour in the bobbin. Looking better…
DSCN2868
Finally, I added the last green—a very, very pale green with a yellow thread in the bobbin. I then took ‘stock’ of the picture (pun!) and decided that the grass was good the way it was. I then started to add the light brown wheat stalks here and there. I used the same brown in the top and bobbin. These were on the original picture in some fashion and I used the source picture only as a reference.
DSCN2869
The final stage was to add the cow parsley. Below you can see how I add each flower head. When I finish a group, I do not snip the thread, but just lift the presser foot and move on to the next area. When I completed all of the cow parsley, I then used small, sharp embroidery scissors and snipped off the connector threat.
DSCN2908
At this point I thought I would add a few highlights with felt markers. I had some areas where the very light green really stood out and I used a dark green marker to colour it in. Man, did I feel smart!! And it looked great when it was done. It was then that I made a FATAL mistake. I misted the piece to iron it flat and that little bit of felt marker bled from the thread onto the white background. Bled. Really. Badly.  I thought I could save it by adding more grasses at the bottom of the piece. That went OK, but see the blob on the left (about halfway up)? I decided to try and paint that out ‘just a bit’ with white paint. Sheesh, just writing that I am wincing. What a disaster!
DSCN2909
Only to you, dear readers, would I show this horrible piece. My only excuse is that it was after midnight last night and I was exhausted. I made one bad decision after another, adding more white, then a light green, then more white, etc… Here is the end result.
IMG_2002 
And a close up just to REALLY let it sink in.
IMG_2004
At that point there was nothing—NOTHING that could have saved this piece. So I took a deep breath and started again. I decided that I needed a coloured background because white was too boring, and  I quickly colour washed a new piece of fabric with a very, very light green. I cannot get the true colour to show here and it looks very yellow. But the colour looks more like the paint chip beside it, except mine is a bit lighter:
DSCN2914  
I did all the same steps as shown above and here are a few pictures of the finished piece. I finished at about 2:30am and by 10:30am it was at the shop. Tomorrow morning class registrations starts and I just got this in on time. Nothing like using every last second to work on a piece!
DSCN2920
DSCN2923  DSCN2921
I’m happy with this one.. Hopefully the purple marks will disappear before tomorrow, but I cannot fret any longer. It is done. Put a fork in it..
PS—it took me 33 minutes to make the second piece. That included photos, threading bobbins and ironing.


Monday, September 3, 2012

Stenciling Fun

My dad and his friend left on Saturday afternoon and I wasted no time in getting my paints and new stencils out to play with.
I love, love, LOVE LuAnn Kessi's blog when she has her play dates. I liked one of her play dates soooo much, I ordered a number of the same stencils and went to town.

Here is how I started. I sprayed on a mist of background colour just so there was not a solid white background. Notice all of the paints on both sides of the table? I used craft paint, thickened Setacolours and some shiny iridescent paints. The last group did not work at all..


 Here is the piece with a few blobs and stencil work. At this point I realized this was a lot of fabric and was sad that I didn't have any friends over to play along with me. 

Looking a bit better. My worries were that I would not have enough stencils. What I had not thought of though is that there is a million ways to use them--print out the whole stencil or just use bits of them. What was an issue was deciding where everything was going to go--and what colours to use.. Try it, you'll be surprised at how few colours you can think of when you are working on something this large.  

Before I show you the final piece, let me show you what my craft room looked like when I was done! I was tripping over everything--it was a mess. See that water pump thing on the ground? It is the best water squirter ever--you pump the top and then just push the button instead of having to keep pushing the trigger on the normal squirter bottles. I got mine at Walmark. It looks like THIS is anyone wants to see..
Stencils drying on the floor. Dog toys, weights (?!), husband's pants (??!!), finished wedding quilt that I haven't given to the couple yet and computer cables everywhere. I cannot believe how messy I can be..
Look at my table! And this is only one side of it..  
And now, without further ado, here is the final piece...
My stencilled piece 
But wait--I just have to show you LuAnn's. Remember that I told you I had purchased similar stencils? Well... I guess I got almost all of the same ones! These pieces are so similar it is unreal. LOL
Copyrighted picture--LuAnn Kessi
 I have no idea what I am going to do with piece. Does anyone have any suggestions?? I used a thick cotton fabric. 


Flower Thread Paining

I have been working on my fall truck picture (no, really I have been), but I wanted to make a quick picture to check some techniques for an upcoming class I am teaching. It was a quick study I did from a photo from Alison Holt’s book, Machine Embroidered Landscapes. Here is the picture I used:

DSCN2838 


This is called “Daisies and Grass”. I was trying to see how I could create a painted background like this. Of course I could have left the project after the painting was done, but I had to finish it to see the final picture. 

Below I have added a series of pictures that show my progress in this piece. Enjoy!

PS--I cannot get Blogger to format this post properly, so my apologies for it's sloppy appearance.


Poly Cotton in the hoop. 
Thin poly-cotton in the hoop. Looks pretty awful, doesn't it?

The first stalks are added. 
   The first stalks are added.    
DSCN2834 
Some of the flowers are added. 
 DSCN2835
 The first of the daisies!
DSCN2842   
Leaves are added. I call them filler.
  DSCN2843
More daisies.
DSCN2844 
More fillers, more detailing.
    DSCN2845
 Here is the back side. Notice the thread is not cut. This is good-it keeps the embroidery from unravelling.DSCN2847  

  I had to add some more background dye since I didn't make it big enough. Sheesh. Then I added some more filler and it was done. Part of why I had to add some background is that I dyed the fabric in the hoop forgetting it needed to be at least 6 x 4 when my hoop was smaller than that…

DSCN2857
Voila! Here is the final piece. Not perfect, but I do like the finished background-and that was what I was
trying to achieve.. 


Sunday, August 19, 2012

Ah, Weddings..

It is not often that I attend a wedding. Neither my sister or I had children and our extended family is very small. Our friends tend to have independent children that either do not intend to marry, or get married in far flung locations. So when I get a chance to go to one, especially one that means so much to me, I am a happy person. Yesterday a young lady that I have known since she was 7 years old got married to her long time partner.

IMG_1921       IMG_1931 

They own a beautiful homestead with hundreds of acres of land here in the Yukon. Their property winds along the Yukon River and for some reason, it rains when the hay needs watering and is beautiful and sunny at all other times.

IMG_1929  IMG_1940

The weather today was perfect. The food was delicious—the couple raised 2 plump pigs for the feast and the meat was delicious. As the evening wore on, I think everyone took a picture of themselves with the pigs head in their hands..

IMG_1928IMG_1941

Even at this time of year, the sun shines until 10-10:30pm, which is unfortunate as the tent looked so romantic after the sun finally set, and of course by then I didn’t have the camera around as I danced the night away.

 IMG_1955                                                                            Bride and Groom (and 2 year old son)

It is for this couple that I made the quilt I spoke about last week. It was a real labour of love and now both of my ‘nieces’ have married and I am so very happy for them.

IMG_1902

My quilting days are not over yet… I have 4 stepdaughters who are in their 20’s and I a hoping they decide to marry so I can make them a wedding quilt as well. Fingers crossed!